Getting Started
Connect natively to Synology Photos or Immich, or to any system supporting WebDAV (or SMB / CIFS). Choose your NAS below for a step-by-step guide.
Make sure Synology Photos is installed
Synology Photos connections require DSM 7.0 or later. Open Package Center on your NAS, confirm the 'Synology Photos' package is installed, and open the app once so your photo library is set up.
Find your NAS address
Note your NAS web address, including the protocol and port: https://YOUR_NAS_IP:5001 for HTTPS (recommended) or http://YOUR_NAS_IP:5000 for HTTP. You can use an IP address or a domain name. QuickConnect IDs and .local addresses are not supported.
Use your DSM account
Sign in with your normal DSM username and password, the same credentials you use to log in to DSM. No dedicated user or WebDAV server is needed. Accounts with two-factor authentication (2FA) enabled are not currently supported.
Connection Details
Synology Photoshttps://YOUR_NAS_IP:5001your_dsm_useryour_dsm_passwordIn Pixette, choose 'Synology Photos' as the connection method, then enter these details. Default ports are 5000 (HTTP) and 5001 (HTTPS). All values are case-sensitive.
No WebDAV setup required
Unlike the WebDAV method, Synology Photos connects straight to the Photos app. You don't need to install the WebDAV Server package or create a dedicated user, just sign in with your DSM account.
Folders and albums, personal and shared
Pixette can browse your personal Synology Photos library as well as the shared space (if enabled on your NAS), either by folder or by album.
Using two-factor authentication?
Synology Photos connections don't currently support accounts with 2FA (one-time password) enabled. Use an account without 2FA, or connect via the WebDAV method instead.
Set Up the Pixette App #
These steps are the same for all NAS types.
Configure Pixette
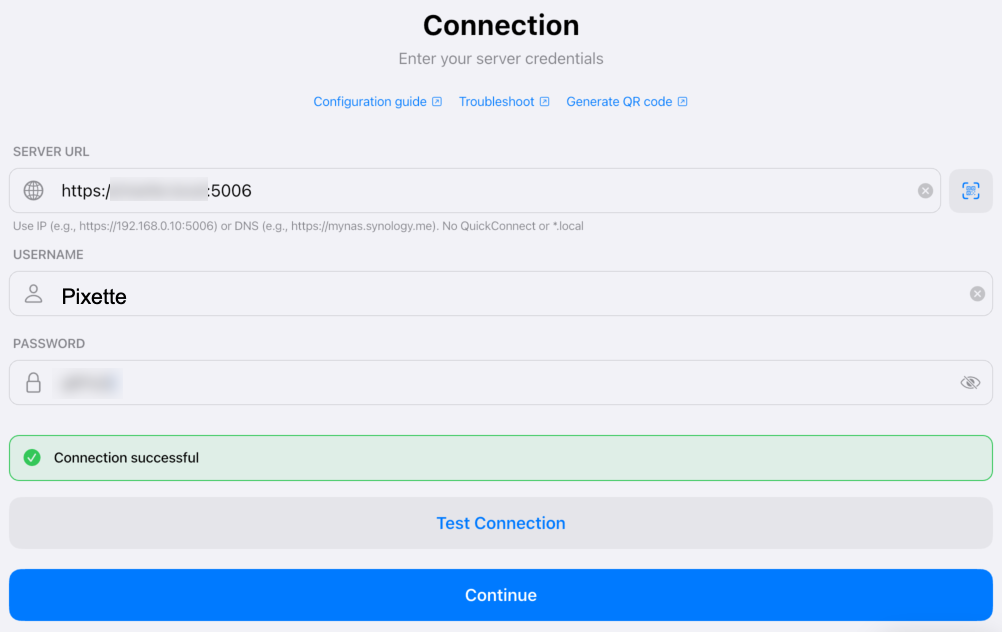
Open Pixette on your device and enter the connection details: URL, username, and password. All values are case-sensitive.
Browse and select folders
Tap 'Connect and browse folders', then select the folder containing your photos.

Index your files
Tap 'Index Now' to catalog all your photos and videos. This may take a few minutes depending on your collection size.
Quick Setup with QR Code
Skip manual typing. Generate a QR code with your NAS connection details and scan it with Pixette for instant configuration. Perfect for setting up multiple devices like photo frame tablets.
Secure and open source. Your credentials never leave your browser. The generator runs entirely client-side. view the source code for full transparency.
Can't see the generator? Open it directly on CodePen
Prefer manual entry?
You can also generate QR codes with any standard QR library. Format the data as pipe-separated values:
host|port|username|password|path
Troubleshoot WebDAV Connection #
If you're having trouble connecting Pixette to your NAS via WebDAV, try these steps. Connecting with Synology Photos instead? Make sure you're on DSM 7.0 or later, the Synology Photos package is installed, and the account you're signing in with does not have two-factor authentication (2FA) enabled.
1. Check that the URL is case-sensitive
WebDAV URLs are case-sensitive. Double-check every character, including folder names.
For example: https://192.168.1.100:5006/Photos/Family
2. Test the connection from a computer first
Try connecting to your NAS via WebDAV from your computer using the exact same URL, username, and password. If your computer can't connect either, the issue is with your NAS configuration, not Pixette.
3. Use simple credentials for testing
Avoid special characters (like & £ @ #) in your password during initial setup. Use only letters and numbers until the connection works, then change to a stronger password.
4. Check if your IP is blocked
On Synology, go to Control Panel → Security → Account → Auto Block and verify that your device's IP address hasn't been blacklisted after failed login attempts.
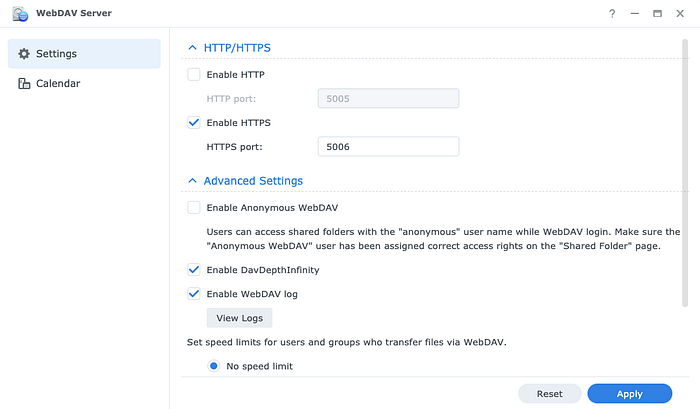
5. Check the firewall and port
If the NAS firewall is enabled, make sure the WebDAV port (e.g. 5006) is allowed. Ensure your device is on the same local network as your NAS.
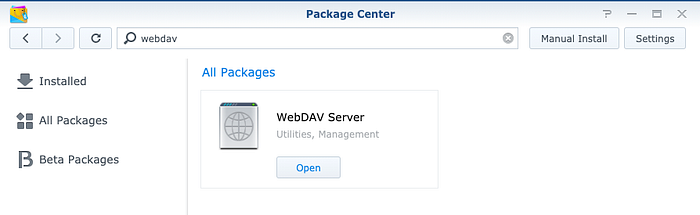
6. Check the WebDAV Server logs
On Synology, open the WebDAV Server package from Package Center to view logs. These logs often reveal the root cause of connection failures (wrong credentials, permission denied, etc.).
Still stuck? Contact me. I'm happy to help you troubleshoot.